Building an AI Voice Assistant with Groq and Deepgram (Part 3)
An interactive React user interface
This is the third and final part of this series on building a fast AI voice assistant using Python, React, Deepgram, Llama 3, and Groq. Here’s a quick recap:
- Part 1: A local Python voice assistant app.
- Part 2: A Python backend with FastAPI & WebSockets.
- Part 3: An interactive React user interface.
In Part 1, we built a local Python application that demonstrated the core features of an AI voice assistant. And in Part 2, we built the Python backend for the complete voice assistant web app.
In this final part, we’ll create a React user interface that allows users to interact with a fully functional AI voice assistant. Users will be able to start and stop conversations, view real-time transcripts and listen to the AI assistant’s responses to their own voice queries.
1. High-Level Overview
1.1. React
The frontend for the voice assistant app is built using React. React is a popular JavaScript library for building dynamic user interfaces. React’s declarative syntax and component-based architecture makes it very easy to create complex UIs.
The main building blocks of a React application are components. A component is essentially a JavaScript function that represents a reusable piece of the user interface, combining its own logic and markup (the structure and appearance of the UI). Components can be as small as a single button or as large as an entire page layout.
In React, components define their UI using a syntax extension called JSX. JSX allows you to write HTML-like markup inside your JavaScript code. When a component renders, it returns this JSX markup, which React then efficiently displays in the browser.
1.2. User Interface
Let’s take a look at the final user interface:
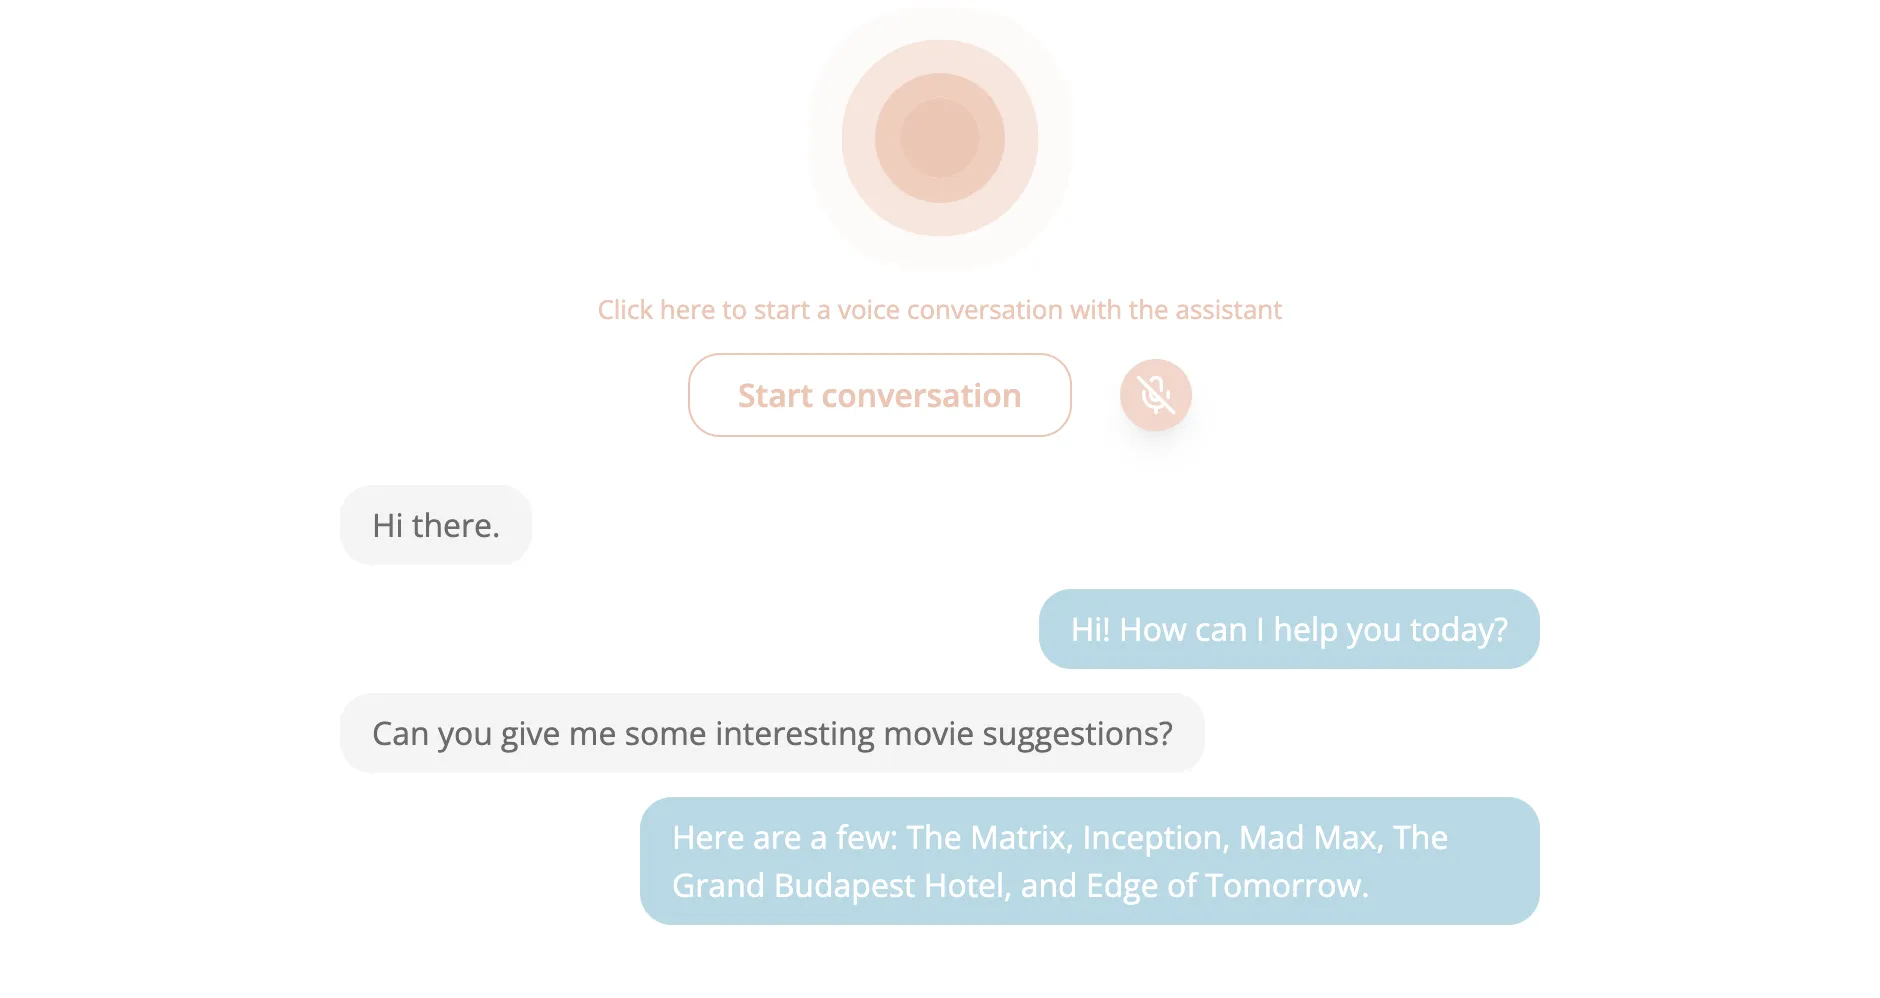
The user interface is designed to be simple and intuitive. It includes:
- A button to start/stop the conversation.
- A button to mute/unmute the microphone.
- The list of conversation messages (including the real-time transcript when the user speaks).
- A small animation at the top that indicates when the assistant is active.
1.3. Client-Server Interaction and Web APIs
As discussed in Part 2, we use WebSockets to create a real-time, bidirectional communication channel between the client (React frontend) and the server (Python backend). To better understand how the frontend and backend interact and what needs to be implemented in the frontend, it’s a good idea to revisit the client-server data flow section in Part 2:

Additionally, to interact with the user’s microphone and be able to play the assistant’s audio responses, we need to use two web APIs:
- MediaStream Recording API: Allows us to access the user’s microphone (with their permission) and record the audio input. The MediaRecorder interface captures the audio stream from the microphone, which is then sent to the server in chunks through the WebSocket connection.
- Media Source API: Allows us to play the assistant’s audio response as it is streamed from the server. The MediaSource interface acts as a container for the audio data, while the SourceBuffer interface is used to append the incoming audio chunks to the MediaSource.
2. Technical Deep Dive
Let’s now dive into the frontend code. You can find it all in the frontend/ folder of this GitHub repository.
We are using the Next.js framework in this application, which follows a specific project structure. However, you can easily adapt the code and use React without a framework with a modern bundler like Vite.
2.1. Application Structure and Core Elements
The voice assistant frontend is a relatively simple application, it consists of a single main component called VoiceAssistant. This component encapsulates all the necessary logic for managing the conversation state, handling user interactions, communicating with the backend via WebSocket, and controlling the microphone and audio playback.
Following a top-down approach, let’s take a look at the structure and core elements of the VoiceAssistant component, shown in this simplified version of the code:
function VoiceAssistant() {
  // State variables
  const [conversation, dispatch] = useReducer(conversationReducer, initialConversation);
  const [isRunning, setIsRunning] = useState(false);
  const [isListening, setIsListening] = useState(false);
  // Refs
  const wsRef = useRef(null);
  const mediaRecorderRef = useRef(null);
  const mediaSourceRef = useRef(null);
  const sourceBufferRef = useRef(null);
  const audioElementRef = useRef(null);
  const audioDataRef = useRef([]);
  const messagesEndRef = useRef(null);

  // Open WebSocket connection and set up event listeners
  function openWebSocketConnection() { }

  // Close WebSocket connection
  function closeWebSocketConnection() { }

  // Request microphone access and start recording
  async function startMicrophone() { }

  // Pause or resume microphone recording
  function toggleListening() { }

  // Stop recording and release microphone
  function stopMicrophone() { }

  // Initialize MediaSource and Audio element to play audio responses
  function startAudioPlayer() { }

  // Stop audio playback and release resources
  function stopAudioPlayer() { }

  async function startConversation() {
    dispatch({ type: 'reset' });  // Reset the conversation messages
    try {
      openWebSocketConnection();
      await startMicrophone();
      startAudioPlayer();
      setIsRunning(true);
      setIsListening(true);
    } catch (err) {
      console.log('Error starting conversation:', err);
      endConversation();
    }
  }

  function endConversation() {
    closeWebSocketConnection();
    stopMicrophone();
    stopAudioPlayer();
    setIsRunning(false);
    setIsListening(false);
  }

  // Simplified JSX (HTML-like markup) returned by the component
  return (
    <div>
      <div>{/* CSS animation */}</div>
      <div>
        {/* Start/end conversation button */}
        <button onClick={isRunning ? endConversation : startConversation}>
          {isRunning ? 'End conversation' : 'Start conversation'}
        </button>
        {/* Mute/unmute microphone button */}
        <button onClick={toggleListening}>
          <Image src={isListening ? micIcon : micOffIcon}/>
        </button>
      </div>
      <div>
        {/* Conversation messages */}
        {conversation.messages.map(message => (
          <div>{message.content}</div>
        ))}
      </div>
    </div>
  );
}
It’s a very simplified version of the application code but it gives us a very clear overview of what’s happening. A few notes:
- We are using Refs with the
useRefhook to reference DOM elements and store mutable values without triggering component re-renders. For example,wsRefstores the WebSocket instance andmediaRecorderRefstores the MediaRecorder instance. You can learn more about Refs in the React docs. - The JSX shown is minimal and doesn’t include all the application elements. It also contains no styling, as the focus here is on the component’s structure and core functionality. If you are not familiar with the JSX syntax, you can learn more about JSX here.
- The
startConversationandendConversationfunctions orchestrate the main flow of the application by calling the necessary secondary functions.
2.2. Application State
In a React application, the state is used to store and manage data that can change over time. The state of our voice assistant application is defined at the top of the VoiceAssistant component, with the useState and useReducer hooks:
const initialConversation = { messages: [], finalTranscripts: [], interimTranscript: '' };

const [conversation, dispatch] = useReducer(conversationReducer, initialConversation);
const [isRunning, setIsRunning] = useState(false);
const [isListening, setIsListening] = useState(false);
isRunning and isListening are simple boolean variables that indicate whether the conversation is currently running and whether the microphone is active (unmuted), respectively.
The conversation state variable holds all the conversation data, including the list of messages that store the conversation history as well as the final transcripts and the current interim transcript of the user’s speech. This variable is managed using a reducer, with the useReducer hook.
A reducer is a function that takes the current state and an action as arguments, and returns the next state based on the action. To update the state, we use dispatch to dispatch one of the actions. This allows us to centralize and manage complex state logic outside of the component in a single function. You can learn more about reducers here.
A reducer is an ideal choice for the conversation state, which involves updating multiple state properties at once (messages, finalTranscripts and interimTranscript) based on different actions ('reset', 'transcript_interim', 'transcript_final' and 'assistant'). The 'reset' action is used to reset the conversation state when a new conversation starts, and the other three actions are used to handle the corresponding JSON messages received from the server. This was all described in section 1.3 of Part 2.
This is the code for the conversationReducer function:
function conversationReducer(state, action) {
  switch(action.type) {
    // Reset the conversation state to its initial values
    case 'reset': {
      return { messages: [], finalTranscripts: [], interimTranscript: '' };
    }
    // Update the interim transcript with the latest content
    case 'transcript_interim': {
      return {
        ...state,
        interimTranscript: action.content
      };
    }
    // Append the final transcript to the list of final transcripts
    // and reset the interim transcript
    case 'transcript_final': {
      return {
        ...state,
        finalTranscripts: [...state.finalTranscripts, action.content],
        interimTranscript: ''
      };
    }
    // Add the user message (joining the previous final transcripts) and the
    // assistant message to the list of messages
    case 'assistant': {
      const newMessages = [];
      if (state.finalTranscripts.length > 0) {
        newMessages.push({ role: 'user', content: state.finalTranscripts.join(' ') });
      }
      newMessages.push({ role: 'assistant', content: action.content });
      return {
        ...state,
        messages: [...state.messages, ...newMessages],
        finalTranscripts: [],
        interimTranscript: ''
      };
    }
    default: {
      return state;
    }
  }
}
2.3. WebSocket Connection
The WebSocket connection is managed by openWebSocketConnection and closeWebSocketConnection:
function openWebSocketConnection() {
  wsRef.current = new WebSocket(process.env.NEXT_PUBLIC_WEBSOCKET_URL);
  wsRef.current.binaryType = 'arraybuffer';

  function handleJsonMessage(jsonData) {
    const message = JSON.parse(jsonData);
    if (message.type === 'finish') {
      endConversation();
    } else {
      // If user interrupts while audio is playing, skip the audio currently playing
      if (message.type === 'transcript_final' && isAudioPlaying()) {
        skipCurrentAudio();
      }
      dispatch(message);
    }
  }

  wsRef.current.onmessage = (event) => {
    if (event.data instanceof ArrayBuffer) {
      handleAudioStream(event.data);
    } else {
      handleJsonMessage(event.data);
    }
  };

  wsRef.current.onclose = () => {
    endConversation();
  }
}

function closeWebSocketConnection() {
  if (wsRef.current) {
    wsRef.current.close();
  }
}
In openWebSocketConnection, we create a new WebSocket instance using the Websocket constructor of the WebSocket API and store it in the wsRef ref. Once created, we can start sending data through the WebSocket using wsRef.current.send(), as we will see shortly.
The onmessage event handler is responsible for processing the data received from the server. As we saw in Part 2, the server sends either JSON messages (interim transcripts, final transcripts, assistant responses or conversation end messages) or binary data (the assistant’s response audio stream). We handle the received data with handleAudioStream for binary data and handleJsonMessage for JSON messages.
handleJsonMessage parses the JSON data and either ends the conversation if the message type is 'finish' or dispatches the corresponding action to update the conversation state using the conversationReducer we have just seen. If the user interrupts the assistant while the audio is playing, we call skipCurrentAudio to stop the current audio playback.
The onclose event handler is invoked when the WebSocket connection is closed by the server, and it simply ends the conversation.
And closeWebSocketConnection is used to close the WebSocket connection when the conversation ends if it’s still active.
2.4. Microphone
The microphone recording functionality is implemented in the startMicrophone, stopMicrophone and toggleListening functions, and uses the MediaStream Recording Web API:
async function startMicrophone() {
  const stream = await navigator.mediaDevices.getUserMedia({ audio: true });
  mediaRecorderRef.current = new MediaRecorder(stream);
  mediaRecorderRef.current.addEventListener('dataavailable', e => {
    if (e.data.size > 0 && wsRef.current.readyState == WebSocket.OPEN) {
      wsRef.current.send(e.data);
    }
  });
  mediaRecorderRef.current.start(250);
}

function stopMicrophone() {
  if (mediaRecorderRef.current && mediaRecorderRef.current.stream) {
    mediaRecorderRef.current.stop();
    mediaRecorderRef.current.stream.getTracks().forEach(track => track.stop());
  }
}

function toggleListening() {
  if (isListening) {
    mediaRecorderRef.current.pause();
  } else {
    mediaRecorderRef.current.resume();
  }
  setIsListening(!isListening);
}
startMicrophone requests access to the user’s microphone using getUserMedia and creates a new MediaRecorder instance with the microphone audio stream. It then adds a dataavailable event listener, which listens to the user’s audio data received from the microphone and sends it to the server via the WebSocket connection using wsRef.current.send().
toggleListening pauses and resumes the microphone recording when the mute/unmute microphone button is clicked.
stopMicrophone stops the microphone and cleans up the resources when the conversation ends.
2.5. Audio Player
The audio player functionality uses the Media Source Web API to play the assistant’s audio response as it is streamed from the server. The main elements are:
- MediaSource: Acts as a container for the audio data. It represents the source of the media data for an HTML media element like
<audio>. - SourceBuffer: Represents a chunk of media data that is appended to the
MediaSource. - Audio Element: The HTML audio element that is used to play the audio data from the
MediaSource. audioDataRef: A ref that references an array used as a buffer to store the incoming audio data chunks from the server until they are appended to theSourceBuffer. This is necessary because theSourceBuffermay not be immediately ready to receive new data when the audio chunks arrive from the server.
Now, let’s take a look at the startAudioPlayer function:
function startAudioPlayer() {
  mediaSourceRef.current = new MediaSource();

  mediaSourceRef.current.addEventListener('sourceopen', () => {
    if (!MediaSource.isTypeSupported('audio/mpeg')) return;

    sourceBufferRef.current = mediaSourceRef.current.addSourceBuffer('audio/mpeg');
    sourceBufferRef.current.addEventListener('updateend', () => {
      if (audioDataRef.current.length > 0 && !sourceBufferRef.current.updating) {
        sourceBufferRef.current.appendBuffer(audioDataRef.current.shift());
      }
    });
  });

  const audioUrl = URL.createObjectURL(mediaSourceRef.current);
  audioElementRef.current = new Audio(audioUrl);
  audioElementRef.current.play();
}
This is what is happening:
- A new
MediaSourceinstance is created and an event listener is added to listen for the'sourceopen'event, which fires when theMediaSourceis ready to receive data. - When the
'sourceopen'event is triggered, the code checks if the ‘audio/mpeg’ codec is supported and a newSourceBufferis created and added to theMediaSourceusingaddSourceBuffer(). - An event listener is added to the
SourceBufferto listen for the'updateend'event, which fires whenever aSourceBufferupdate operation completes and it’s ready to receive new data. We then take the next audio chunk from the audio data buffer referenced byaudioDataRefand append it to theSourceBuffer. - A URL is created for the
MediaSourceusingURL.createObjectURL(), and a newAudioelement is created with this URL as itssrc. - Finally, the
Audioelement starts playing using theplay()method, waiting for the first audio chunks to be received from the server.
Now it’s a good time to go back to two functions that we skipped earlier in the WebSocket onmessage event handler: handleAudioStream and skipCurrentAudio
function handleAudioStream(streamData) {
  audioDataRef.current.push(new Uint8Array(streamData));
  if (sourceBufferRef.current && !sourceBufferRef.current.updating) {
    sourceBufferRef.current.appendBuffer(audioDataRef.current.shift());
  }
}

function skipCurrentAudio() {
  audioDataRef.current = [];
  const buffered = sourceBufferRef.current.buffered;
  if (buffered.length > 0) {
    if (sourceBufferRef.current.updating) {
      sourceBufferRef.current.abort();
    }
    audioElementRef.current.currentTime = buffered.end(buffered.length - 1);
  }
}
handleAudioStream is called when new audio stream data is received from the server. As mentioned earlier, rather than appending the data directly to the SourceBuffer and risk losing some chunks, we first add it to the audioDataRef array and only update SourceBuffer if it’s not currently being updated. If it is, then the updateend event listener we defined earlier will make sure to update SourceBuffer once the current operation ends and it’s ready to receive new data.
By using this approach, the audio data is continuously appended to the SourceBuffer as it arrives from the server, allowing for smooth playback of the audio stream. And the audioDataRef buffer ensures that no audio data is lost if the SourceBuffer is not ready to receive new data when the audio chunks arrive from the server.
The other function mentioned, skipCurrentAudio, is used to allow the user to interrupt the assistant’s audio response. It just clears the audioDataRef buffer, aborts any SourceBuffer updates in progress and sets the currentTime of the Audio element forward, effectively skipping the remaining audio.
Finally, the stopAudioPlayer function simply cleans up the resources when the conversation ends:
function stopAudioPlayer() {
  if (audioElementRef.current) {
    audioElementRef.current.pause();
    URL.revokeObjectURL(audioElementRef.current.src);
    audioElementRef.current = null;
  }

  if (mediaSourceRef.current) {
    if (sourceBufferRef.current) {
      mediaSourceRef.current.removeSourceBuffer(sourceBufferRef.current);
      sourceBufferRef.current = null;
    }
    mediaSourceRef.current = null;
  }

  audioDataRef.current = [];
}
2.6 Running the Code
Now that we have completed both the backend and frontend of the voice assistant app, it’s time to finally run it. To do so, follow these steps in your terminal or command-line interface:
-
Clone the GitHub repository containing the code:
git clone https://github.com/ruizguille/voice-assistant.git -
Run the backend server by following the instructions from Part 2.
-
In a new terminal window, navigate to the frontend folder and install the JavaScript dependencies:
cd voice-assistant/frontend npm install -
Create a
.envfile in the frontend folder copying the.env.examplefile provided that includes the required environment variable:NEXT_PUBLIC_WEBSOCKET_URL. -
Start the frontend server and visit
http://localhost:3000in your browser to access the application:npm run dev
3. Conclusion
In this 3-part series, we’ve explored a wide range of technologies (including Python, React, Groq, Deepgram, WebSockets, asynchronous programming, FastAPI, and Web APIs) to build a fully functional, real-time voice assistant that showcases the potential of AI in web development.
There is, of course, room for improvement. For example, the audio player doesn’t support iOS on iPhone due to the lack of Media Source API support. And another issue is that the assistant’s audio response is occasionally captured by the microphone and interpreted as user speech, leading to unintended behavior. This is a common challenge in voice assistant systems, and addressing it could involve more advanced echo cancellation and audio processing techniques.
It’s also worth noting that the recent OpenAI Spring Update introduced their new model GPT-4o, which is able to accept as input and generate as output any combination of text, audio, image and video. This could revolutionize the way voice assistants are built, reducing latency and enabling more advanced functionalities, such as considering the speaker’s tone, handling multiple speakers, and expressing emotions in the response.
I hope this series has been helpful. The code for this project is available on GitHub under the MIT license, so feel free to explore, experiment, and build upon it.
And if you have any questions, comments, or would like to learn more about what we do at CodeAwake, don’t hesitate to reach out to me at [email protected].