Building an AI Chatbot Powered by Your Data
A Retrieval Augmented Generation (RAG) chatbot implementation with FastAPI, Redis and OpenAI
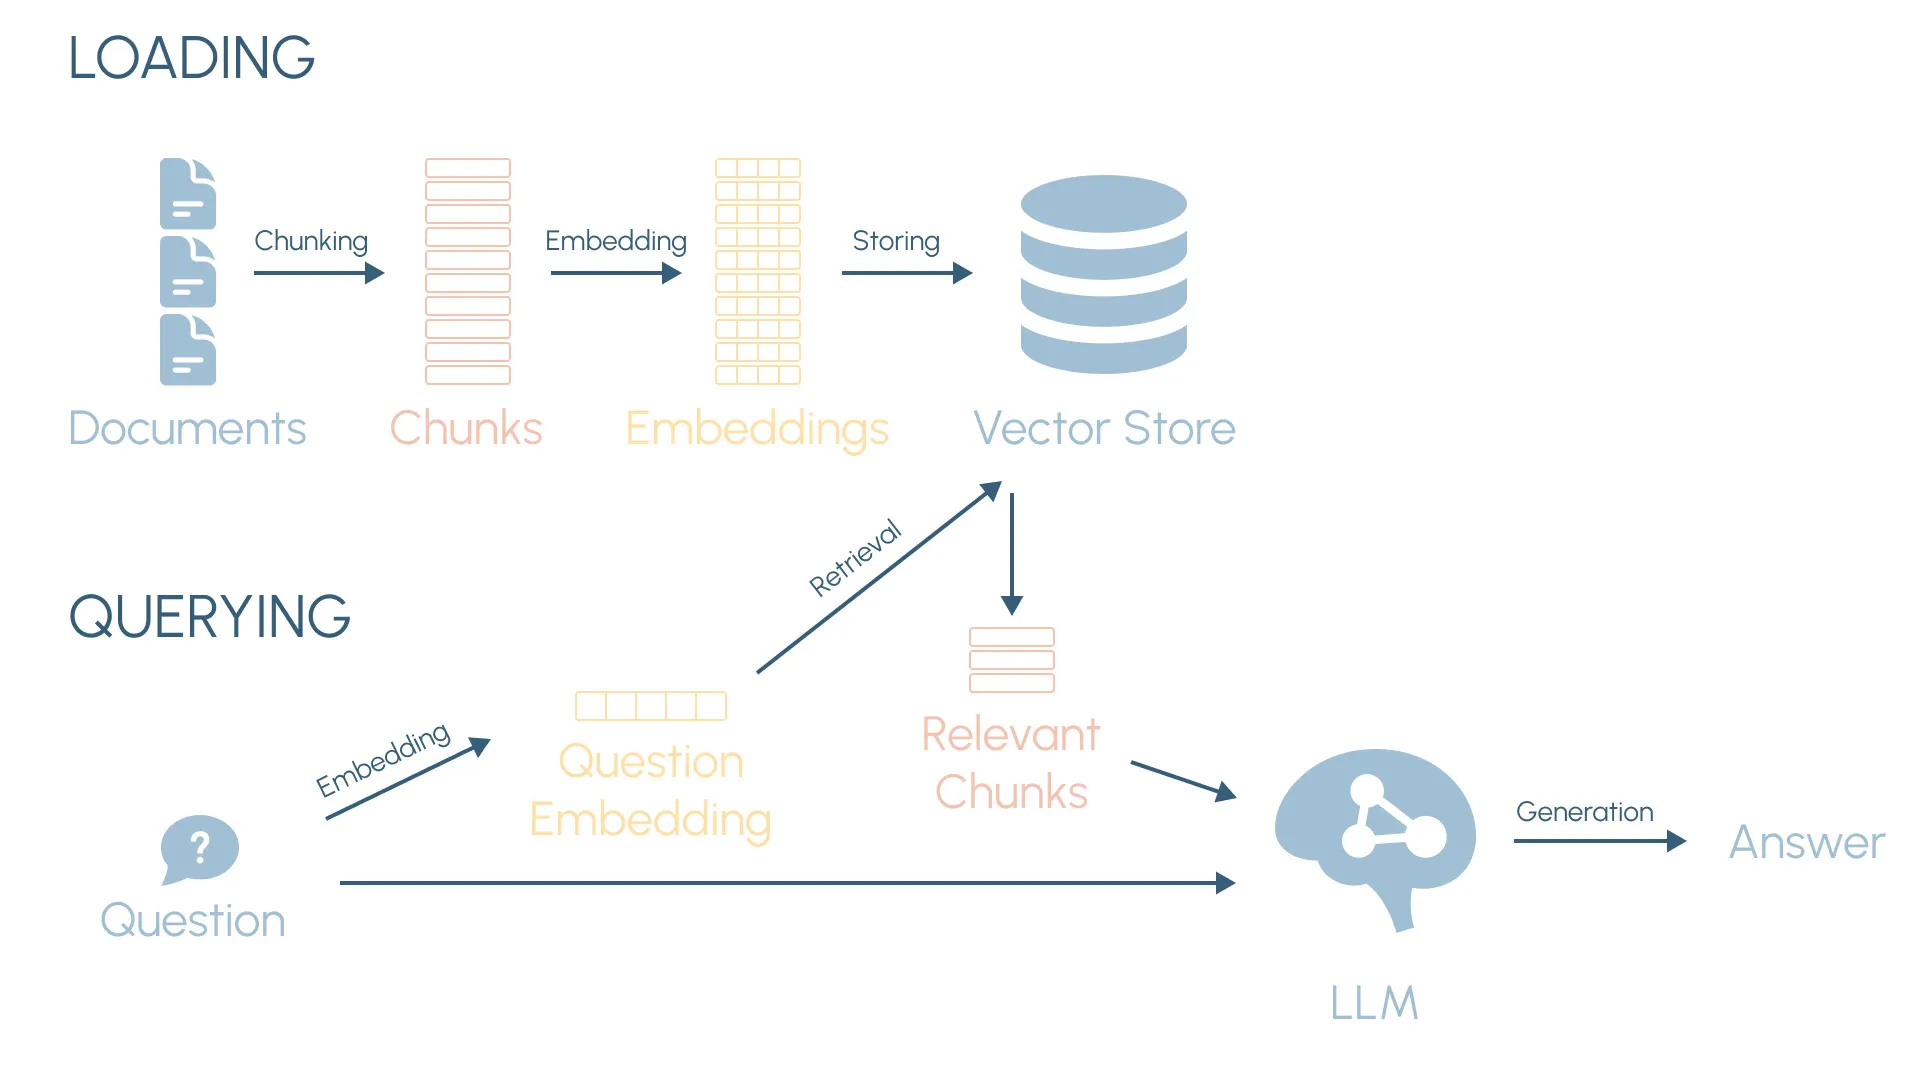
In a previous post, “Retrieval Augmented Generation from Scratch”, we explored the fundamentals of RAG systems by building a basic local application in Python from the ground up. We covered key concepts like document loading, chunking, vector embeddings and semantic search. The application we built was capable of answering questions about the movie Inception using its screenplay as the data source.
Now we are taking this to the next level. In this blog post, we are building a production-ready AI chatbot application that shows how these concepts can be applied in a real-wold use case. It will be a technology trends chatbot powered by the latest technology reports from top institutions like the World Bank, the WEF, McKinsey, Deloitte and the OECD.
This will be a full-stack web application, with a Python backend (covered here) and a React frontend (covered in the next post). And while this is just a specific example, the beauty of this system is that it can be customized with your own data sources and applied to different use cases.
We are also going to be using more advanced techniques and technologies to create a production-ready application. A brief outline of what we’ll cover:
- FastAPI to develop the backend API.
- Redis as a lightning-fast vector database for semantic search and chat storage.
- OpenAI’s embeddings and GPT-4o as the chatbot’s large language model (LLM).
- OpenAI’s tool calling and the recently released Structured Outputs feature.
- Conversation memory using chat history.
- Streaming responses using Server-Sent Events.
- Asynchronous Python programming with asyncio.
- A React user interface (in the next post).
The techniques we’ll cover can be applied to many different domains, from technology assistants to customer support, financial research or any field where specialized and up-to-date information retrieval is key.
You can find all the application code in this GitHub repository. While I’ll do my best to explain as much as possible in this blog post, you can check the finer details there. And if you are not familiar with some of the concepts, make sure to revise the previous RAG from scratch post.
Backend Project Structure
Before diving into the details, let’s take a look at the backend project structure to get an overview of how the AI chatbot application is organized:
backend/
│
├── app/
│   ├── assistants/
│   │   ├── assistant.py        # Main assistant class for API
│   │   ├── local-assistant.py  # Assistant class for local console app
│   │   ├── prompts.py          # Assistant prompts
│   │   └── tools.py            # Contains the assistant's QueryKnowledgeBaseTool
│   │
│   ├── utils/
│   │   ├── splitter.py         # Text splitter utility
│   │   └── sse_stream.py       # SSEStream class for server-sent events
│   │
│   ├── api.py                  # FastAPI endpoints
│   ├── config.py               # Pydantic Settings configuration
│   ├── db.py                   # Redis database code
│   ├── export.py               # Utility to export all chats to JSON
│   ├── loader.py               # Document processing and knowledge base loading
│   ├── main.py                 # Main FastAPI application
│   └── openai.py               # OpenAI API functions
│
└── pyproject.toml              # Project dependencies and configuration
Building the Knowledge Base
The first thing we need in a RAG-based chatbot is a knowledge base, which contains the data that will be used to answer user questions. Let’s take a look at the main function that builds the knowledge base:
async def load_knowledge_base():
    async with get_redis() as rdb:
        await setup_db(rdb)
        chunks = await process_docs()
        await add_chunks_to_vector_db(rdb, chunks)
The get_redis() function opens an async connection to Redis (we will cover Redis in the next section). We then set up the database, process the source documents (in our use case, the technology reports PDFs) and store the processed chunks with their vector embeddings in the vector database.
The document processing function is similar to what we did in the previous RAG from scratch post and includes:
- Loading and extracting the text from the source PDF files.
- Splitting the documents down into smaller text chunks, with some overlap to preserve cross-chunk context.
- Converting the text chunks into vector embeddings (using OpenAI’s embeddings) that encode their meaning.
- Storing the text chunks and vector embeddings in the vector database.
Here’s a slightly simplified version of the document processing code:
async def process_docs(docs_dir=settings.DOCS_DIR):
    docs = []
    pdf_files = [f for f in os.listdir(docs_dir) if f.endswith('.pdf')]
    for filename in tqdm(pdf_files):
        file_path = os.path.join(docs_dir, filename)
        text = extract_text(file_path)
        doc_name = os.path.splitext(filename)[0]
        docs.append((doc_name, text))

    chunks = []
    text_splitter = TextSplitter(chunk_size=512, chunk_overlap=150)

    for doc_name, doc_text in docs:
        doc_id = str(uuid4())[:8]
        doc_chunks = text_splitter.split(doc_text)
        for chunk_idx, chunk_text in enumerate(doc_chunks):
            chunk = {
                'chunk_id': f'{doc_id}:{chunk_idx+1:04}',
                'text': chunk_text,
                'doc_name': doc_name,
                'vector': None
            }
            chunks.append(chunk)

    vectors = []
    for batch in batchify(chunks, batch_size=64):
        batch_vectors = await get_embeddings([chunk['text'] for chunk in batch])
        vectors.extend(batch_vectors)

    for chunk, vector in zip(chunks, vectors):
        chunk['vector'] = vector
    return chunks
If you are curious about the TextSplitter functionality, it was covered in the previous RAG post and you can also check the code in detail here.
Creating the vector embeddings with OpenAI is as simple as:
from openai import AsyncOpenAI

client = AsyncOpenAI(api_key=settings.OPENAI_API_KEY)

async def get_embeddings(input, model=settings.EMBEDDING_MODEL, dimensions=settings.EMBEDDING_DIMENSIONS):
    res = await client.embeddings.create(input=input, model=model, dimensions=dimensions)
    return [d.embedding for d in res.data]
Redis Database
Redis is a high-performance and very versatile in-memory database. Even though it’s more popular as a cache, it has evolved a lot in the last years and includes powerful extensions for JSON, search and even vector search. It also offers different persistence options to ensure data safety.
If you are new to Redis, their quick start guides are great to get up to speed. And make sure to check out the Python library examples too.
In our application, Redis plays a dual role:
- As a vector database for semantic search, allowing us to retrieve the most semantically similar chunks to a specific user question.
- As a general database for chat storage.
In order to store vectors and perform vector searches, we need to create an index:
async def create_vector_index(rdb):
    schema = (
        TextField('$.chunk_id', no_stem=True, as_name='chunk_id'),
        TextField('$.text', as_name='text'),
        TextField('$.doc_name', as_name='doc_name'),
        VectorField(
            '$.vector',
            'FLAT',
            {
                'TYPE': 'FLOAT32',
                'DIM': settings.EMBEDDING_DIMENSIONS,
                'DISTANCE_METRIC': 'COSINE'
            },
            as_name='vector'
        )
    )
    await rdb.ft('idx:vector').create_index(
        fields=schema,
        definition=IndexDefinition(prefix=['vector:'], index_type=IndexType.JSON)
    )
The index is of type JSON. Along with the vector embedding (the vector property) we are storing other metadata properties like chunk_id, doc_name (useful for citations) and the actual chunk text in text. The 'vector:' prefix means that all the vector objects must be stored with keys that start with that prefix to be indexed.
It’s important to mention that it’s not necessary to index every field when you are storing data in Redis. You should only index those fields that you are going to use in the queries, to make the queries performant. For example, the index we are using to store the chat objects is much simpler, and only includes the created property in case we want to retrieve the latest chats sorted by date:
async def create_chat_index(rdb):
		schema = (
		    NumericField('$.created', as_name='created', sortable=True),
		)
		await rdb.ft('idx:chat').create_index(
		    fields=schema,
		    definition=IndexDefinition(prefix=['chat:'], index_type=IndexType.JSON)
		)
Let’s now look at some of the key functions that interact with our Redis database. This is the function used in the previous section to add chunks to the vector database:
async def add_chunks_to_vector_db(rdb, chunks):
    async with rdb.pipeline(transaction=True) as pipe:
        for chunk in chunks:
            pipe.json().set('vector:' + chunk['chunk_id'], Path.root_path(), chunk)
        await pipe.execute()
This function performs semantic search using the K-nearest neighbors (KNN) algorithm and retrieves the top_k most similar chunks:
async def search_vector_db(rdb, query_vector, top_k=settings.VECTOR_SEARCH_TOP_K):
    query = (
        Query(f'(*)=>[KNN {top_k} @vector $query_vector AS score]')
        .sort_by('score')
        .return_fields('score', 'chunk_id', 'text', 'doc_name')
        .dialect(2)
    )
    res = await rdb.ft(VECTOR_IDX_NAME).search(query, {
        'query_vector': np.array(query_vector, dtype=np.float32).tobytes()
    })
    return [{
        'score': 1 - float(d.score),
        'chunk_id': d.chunk_id,
        'text': d.text,
        'doc_name': d.doc_name
    } for d in res.docs]
Notice how we are calculating the similarity score as 1 - float(d.score) because the score returned in the query is the cosine distance (the smaller the cosine distance, the bigger the similarity to the user query). And we are interested in the top_k most similar chunks (we will use top 10 in our app). Notice also how Redis requires the query vector to be a byte array, that’s why we are using Numpy’s np.array() and tobytes().
Finally, these are the functions used to create chats, check if a chat exists, add new messages to a chat and retrieve the last_n messages of a specific chat (useful for the conversation memory):
async def create_chat(rdb, chat_id, created):
    chat = {'id': chat_id, 'created': created, 'messages': []}
    await rdb.json().set('chat:' + chat_id, Path.root_path(), chat)
    return chat

async def chat_exists(rdb, chat_id):
    return await rdb.exists('chat:' + chat_id)

async def add_chat_messages(rdb, chat_id, messages):
    await rdb.json().arrappend('chat:' + chat_id, '$.messages', *messages)

async def get_chat_messages(rdb, chat_id, last_n=None):
    if last_n is None:
        messages = await rdb.json().get('chat:' + chat_id, '$.messages[*]')
    else:
        messages = await rdb.json().get('chat:' + chat_id, f'$.messages[-{last_n}:]')
    return [{'role': m['role'], 'content': m['content']} for m in messages] if messages else []
API Endpoints
We are building the backend using FastAPI, a modern and fast framework for building APIs with Python. In our application, there are two main endpoints:
- Create a new chat session.
- Send a message and get the chatbot response in a specific chat session.
Let’s see the endpoints in code:
from fastapi import APIRouter, Depends, HTTPException

router = APIRouter()

@router.post('/chats')
async def create_new_chat(rdb = Depends(get_rdb)):
    chat_id = str(uuid4())[:8]
    created = int(time())
    await create_chat(rdb, chat_id, created)
    return {'id': chat_id}

@router.post('/chats/{chat_id}')
async def chat(chat_id: str, chat_in: ChatIn):
    rdb = get_redis()
    if not await chat_exists(rdb, chat_id):
        raise HTTPException(status_code=404, detail=f'Chat {chat_id} does not exist')
    assistant = RAGAssistant(chat_id=chat_id, rdb=rdb)
    sse_stream = assistant.run(message=chat_in.message)
    return EventSourceResponse(sse_stream, background=rdb.aclose)
The chat endpoint creates an instance of a RAGAssistant class, which handles the core logic of our chatbot, as we will see shortly. It calls the run() method with the user message and uses Server-Sent Events (SSE) to stream the assistant’s responses back to the client in real-time. For that, we are using the EventSourceResponse from the sse-starlette library.
Note also that we are using FastAPI’s dependency injection system in rdb = Depends(get_rdb) to manage Redis connections. Using the yield statement, we can open a Redis connection when the request starts and close it after it ends:
async def get_rdb():
    rdb = get_redis()
    try:
        yield rdb
    finally:
        await rdb.aclose()
⚠️ Due to a limitation with FastAPI’s streaming responses after version 0.106, we cannot use a dependency with yield to close the Redis connection in the chat endpoint, so we do it using a background task in the EventSourceResponse.
With the endpoints defined, creating a FastAPI application is straightforward:
from fastapi import FastAPI

app = FastAPI()
app.include_router(router)
RAG Assistant Class
The RAGAssistant class contains the core logic of our RAG chatbot. It manages user conversations, persists chat history, queries the knowledge base for relevant information and uses the LLM with Retrieval Augmented Generation to answer user questions.
The class is initialized as follows:
from openai import pydantic_function_tool

class RAGAssistant:
    def __init__(self, chat_id, rdb, history_size=4, max_tool_calls=3):
        self.chat_id = chat_id
        self.rdb = rdb
        self.sse_stream = None
        self.main_system_message = {'role': 'system', 'content': MAIN_SYSTEM_PROMPT}
        self.rag_system_message = {'role': 'system', 'content': RAG_SYSTEM_PROMPT}
        self.tools_schema = [pydantic_function_tool(QueryKnowledgeBaseTool)]
        self.history_size = history_size
        self.max_tool_calls = max_tool_calls
A quick overview of these attributes:
chat_id: Current chat session id.rdb: Redis database connection.sse_stream: SSE stream for real-time response streaming.main_system_messageandrag_system_message: System prompts guiding the assistant’s behavior.tools_schema: Available tools for the assistant, in our case only theQueryKnowledgeBaseTool. Thepydantic_function_toolgenerates the tool’s JSON schema.history_size: Number of previous messages to include in each conversation interaction.max_tool_calls: Maximum number of tool calls per interaction.
One of the key features of our chatbot is its ability to provide streaming responses. This is achieved through a combination of asynchronous programming and server-sent events (SSE). Let’s take a look at the main run method (used in the chat endpoint):
def run(self, message):
    self.sse_stream = SSEStream()
    asyncio.create_task(self._handle_conversation_task(message))
    return self.sse_stream
When a new user message arrives, the assistant creates an SSEStream object to queue and handle the response stream. It then creates an asynchronous task with asyncio to handle the conversation and immediately returns the sse_stream. This allows us to start streaming the response to the client as soon as the first chunks become available, rather than waiting for the whole process to complete.
Instead of awaiting self._handle_conversation_task(message) in the run method, we launch it as a concurrent task. This approach allows the conversation handling and response streaming to run simultaneously.
The _handle_conversation_task method runs the conversation step logic, handles any errors and ensures that the sse_stream is always closed at the end:
async def _handle_conversation_task(self, message):
    try:
        await self._run_conversation_step(message)
    except Exception as e:
        print(f'Error: {str(e)}')
        # Other error handling
    finally:
        await self.sse_stream.close()
The _run_conversation_step logic is where we apply RAG, query the knowledge base tool and use the LLM to generate the response for the user. It’s probably the most important part of the RAG chatbot and we are going to cover it in detail next.
Implementing RAG with Tool Calling and Structured Outputs
My last post, “OpenAI’s Structured Outputs for RAG and Data Extraction”, covered OpenAI’s new Structured Outputs feature. This feature ensures that model responses match a defined schema. The post explained how to define the schemas using Pydantic and showed helpful parsing functions provided by the OpenAI Python SDK. It also included some examples of how to use structured outputs in RAG applications, with and without streaming.
Our AI chatbot uses these same techniques, so I recommend checking out that post if you want a deeper understanding of the details.
The RAG process is integrated into our chatbot’s conversation flow through the _run_conversation_step method in the RAGAssistant class:
async def _run_conversation_step(self, message):
    user_db_message = {'role': 'user', 'content': message, 'created': int(time())}
    chat_messages = await get_chat_messages(self.rdb, self.chat_id, last_n=self.history_size)
    chat_messages.append({'role': 'user', 'content': message})
    assistant_message = await self._generate_chat_response(
        system_message=self.main_system_message,
        chat_messages=chat_messages,
        tools=self.tools_schema
    )
    tool_calls = assistant_message.tool_calls

    if tool_calls:
        chat_messages.append(assistant_message)
        assistant_message = await self._handle_tool_calls(tool_calls, chat_messages)

    assistant_db_message = {
        'role': 'assistant',
        'content': assistant_message.content,
        'tool_calls': [
            {'name': tc.function.name, 'arguments': tc.function.arguments} for tc in tool_calls
        ],
        'created': int(time())
    }
    await add_chat_messages(self.rdb, self.chat_id, [user_db_message, assistant_db_message])
Here is a breakdown of what the method does:
- Create a user message object with the received message and a timestamp for database storage.
- Fetch the last
self.history_sizechat messages from the database for the currentchat_idsession and append the new user message. - Call the LLM (OpenAI’s GPT-4o) with the main system message, provided tools and chat history to generate the assistant’s response. The LLM then decides whether it needs to call a tool to properly answer the user’s question. In our case we are only providing the
QueryKnowledgeBaseTool. - If the assistant response contains any tool calls, run the tools and generate a new assistant response that uses the tool results. In our chatbot, this means answering user questions with the relevant information retrieved from the knowledge base.
- Create an assistant message object with the final assistant response and add both the initial user message and this assistant message to the database chat history.
If you are curious, this is the main system prompt we are using:
MAIN_SYSTEM_PROMPT = """
You are a knowledgeable assistant specialized in answering questions about new technology trends, their applications in various sectors and their broader impacts.

You have access to the 'QueryKnowledgeBaseTool,' which includes technology reports from the world's leading institutions.
Use this tool to query the knowledge base and answer user questions.

Do not rely on prior knowledge or make answers up.
Always use the provided 'QueryKnowledgeBaseTool' to ensure your answers are grounded in the most up-to-date and accurate information available.

If a user's question seems unrelated, try to find a relevant technology angle.
Only if the question is completely completely outside the scope of technology, kindly remind the user of your specialization.
"""
The _generate_chat_response method calls the LLM and handles the streaming of the LLM’s response:
async def _generate_chat_response(self, system_message, chat_messages, **kwargs):
     messages = [system_message, *chat_messages]
     async with chat_stream(messages=messages, **kwargs) as stream:
        async for event in stream:
            if event.type == 'content.delta':
                await self.sse_stream.send(event.delta)

        final_completion = await stream.get_final_completion()
        assistant_message = final_completion.choices[0].message
        return assistant_message
This method checks every chunk in the response stream generated by the LLM. If it’s of type 'content.delta' (containing new text content), we stream it to the client in real-time using the sse_stream object. At the end, we call the get_final_completion method to get the final accumulated response once it has been fully generated, including the full content and any tool calls if the model decides it needs them.
The chat_stream function is just a wrapper over the client.beta.chat.completions.stream() method provided by the OpenAI Python SDK. If you want to know more about the details of streaming with structured outputs, check this section of my last post.
As mentioned earlier, we provide a single tool to the assistant for querying the knowledge base. We define the tool using Pydantic:
from pydantic import BaseModel, Field

class QueryKnowledgeBaseTool(BaseModel):
    """Query the knowledge base to answer user questions about new technology trends, their applications and broader impacts."""
    query_input: str = Field(description='The natural language query input string. The query input should be clear and standalone.')

    async def __call__(self, rdb):
        query_vector = await get_embedding(self.query_input)
        chunks = await search_vector_db(rdb, query_vector)
        formatted_sources = [f'SOURCE: {c['doc_name']}\n"""\n{c['text']}\n"""' for c in chunks]
        return f"\n\n---\n\n".join(formatted_sources) + f"\n\n---"
The QueryKnowledgeBaseTool includes a __call__ method to make it callable. Once instantiated with a specific natural language query_input, it can be called to query the knowledge base and retrieve the most semantically relevant chunks to that query input. Calling the tool does the following:
- Converts the query input to a vector embedding that encodes its meaning.
- Queries the Redis vector database to retrieve the top 10 most semantically similar chunks.
- Returns the relevant chunks formatted as a string of sources, each one including the document name for citations.
If we want our OpenAI LLM to be able to call a tool, we need to provide a JSON schema describing what the tool does and what parameters are required to call it. The OpenAI-provided pydantic_function_tool that we used in the assistant initialization conveniently converts any Pydantic tool definition to the required JSON schema:
self.tools_schema = [pydantic_function_tool(QueryKnowledgeBaseTool)]Finally, let’s see what the _handle_tool_calls method does:
async def _handle_tool_calls(self, tool_calls, chat_messages):
    for tool_call in tool_calls[:self.max_tool_calls]:
        kb_tool = tool_call.function.parsed_arguments
        kb_result = await kb_tool(self.rdb)
        chat_messages.append(
            {'role': 'tool', 'tool_call_id': tool_call.id, 'content': kb_result}
        )
    return await self._generate_chat_response(
        system_message=self.rag_system_message,
        chat_messages=chat_messages,
    )
A key detail here is that, because we are using the structured outputs feature and passing the Pydantic tool definition as input, the OpenAI LLM automatically parses any tool calls into instances of our Pydantic tool model. This is handled by the OpenAI-provided client.beta.chat.completions.stream() method mentioned earlier.
As a result, when the LLM decides it needs to call the knowledge base tool, the tool_call.function.parsed_arguments property will contain an actual instance of QueryKnowledgeBaseTool, with the query_input parameter filled in. And because we made the tool callable with the __call__ method, we can simply call it to query the knowledge base.
We then append a new “tool message” to the chat containing the tool result (the top 10 relevant chunks formatted as a string of sources) and call the _generate_chat_response method again to generate the final response. The LLM can then use this tool result as context to answer the user’s question. This is the core idea of Retrieval Augmented Generation.
Notice that we are using a different system message this time (self.rag_system_message) more focused on the RAG process. This is the RAG system prompt we are using:
RAG_SYSTEM_PROMPT = """
You are a knowledgeable assistant specialized in answering questions about new technology trends, their applications in various sectors and their broader impacts.
Use the sources provided by the 'QueryKnowledgeBaseTool' to answer the user's question. You must only use the facts from the sources in your answer.

Make sure to reference and include relevant excerpts from the sources to support your answers.
When providing an answer, mention the specific report from which the information was retrieved (e.g., "According to the [Report Name], ...").
Your answers must be accurate and grounded on truth.

If the information needed to answer a question is not available in the sources, say that you don't have enough information and share any relevant facts you find.
"""
This is a powerful approach for building more complex chatbots and LLM-based applications. Rather than having a single LLM, with a single system prompt and specific tools, you can orchestrate a collection of agents with different systems prompts and tools, each specialized in a specific task.
Streaming Responses with Server-Sent Events
Typically, the client needs to send a request to receive data from the server. However, in our AI chatbot, we want the server to stream content to the client in real-time, sending each text chunk as it becomes available. This makes the chatbot application feel fast and responsive, which is essential for a great user experience.
A possible approach is to use WebSockets, which create a bidirectional connection between the client and the server. However, for our use case, there’s a simpler approach that works just as well and can be implemented directly using HTTP requests: Server-Sent Events (SSE).
Server-Sent Events allow the sever to asynchronously send data to the client once an HTTP connection is established, which is exactly what we need. To implement SSE in Python with FastAPI, we are using the sse-starlette library.
Implementing SSE in FastAPI is as simple as passing an asynchronous generator to the EventSourceResponse that provides the data to be streamed:
from sse_starlette.sse import EventSourceResponse

async def sse_endpoint():
    return EventSourceResponse(generator)
In our AI chatbot, we are using a custom SSEStream class that simplifies the process of sending data to the stream from different parts of our application:
import asyncio
from sse_starlette import ServerSentEvent

class SSEStream:
    def __init__(self) -> None:
        self._queue = asyncio.Queue()
        self._stream_end = object()

    def __aiter__(self):
        return self

    async def __anext__(self):
        data = await self._queue.get()
        if data is self._stream_end:
            raise StopAsyncIteration
        return ServerSentEvent(data=data)

    async def send(self, data):
        await self._queue.put(data)

    async def close(self):
        await self._queue.put(self._stream_end)
These are the key insights of the implementation:
- The class uses an asyncio queue to store and manage the stream data.
- The
sendmethod adds new data to the queue. - The
closemethod closes the stream by adding the_stream_endsentinel object. - The
__aiter__and__anext__methods allow the stream to be consumed as an async generator by retrieving data from the queue and returning it as server-sent events until the sentinel object is found. This is what theEventSourceResponseuses to stream the data as it becomes available.
With this context, it should now be clearer how streaming is integrated in our application. Synthesizing what we have seen in previous sections:
- We instantiate the stream in the
runmethod of theRAGAssistantclass like this:self.sse_stream = SSEStream(). - We launch the
_handle_conversation_taskconcurrently to handle the conversation logic while we are streaming the response. - We return the stream to the FastAPI
chatendpoint to be able to immediately start streaming to the client usingreturn EventSourceResponse(sse_stream). - In the
_generate_chat_responsemethod of theRAGAssistantclass, when we receive new content chunks from the LLM model, we stream them directly to the client usingawait self.sse_stream.send(event.delta).
Conclusion
We have now explored in detail the building blocks and code necessary to create a production-ready AI chatbot powered by your own data. In the next post, we’ll build the chatbot’s user interface in React.
If you are interested in diving deeper, the complete code is available in the GitHub repository. The README provides instructions for installation and running both the full-stack app and a local Python version for testing in your console. You can easily customize it with your own data sources and build RAG chatbots for other use cases.
It’s also important to highlight that the current RAG implementation still has limitations. More advanced use cases may require additional techniques like: hybrid search (combining vector search with keyword-based search), query rewriting, query decomposition, metadata filtering, reranking and recursive retrieval.
If you have any questions, comments, or would like to implement similar AI-based applications in your business, you can reach out to me at [email protected].